Cable Routing Basics
 In
Part I, you'll route cable from the central
point to the exact places in the schoolrooms where
you'll install the jacks. When you've run a pair of cables
to all six schoolrooms, you've finished Part I.
In
Part I, you'll route cable from the central
point to the exact places in the schoolrooms where
you'll install the jacks. When you've run a pair of cables
to all six schoolrooms, you've finished Part I.
Use a relay
system - passing the leading end of the cable from one
person to the next, and so on - to get the cable from one
end of each run to the other. We'll show you several different
ways to mount cable along walls and route it through dropped
ceilings and inside walls. Your school's facilities
administrator is the key person in deciding on the best
way to route cable at your school and exactly
where to route it.
These instructions
show how to route cable simply and safely in many situations.
They provide for cable routing only within a building,
not between buildings. Discuss these instructions with
the person who manages facilities at your school. See the NetDay
How-To Guide for more information on doing a site survey
and planning wiring at your school.
You'll run
two cables to each schoolroom, so that you can install
two jacks per room. That way, after NetDay, computers can
be plugged in at either end of the room - for example,
one for the teacher to use up front, and one for students
to use at the back of the room. Having two or more jacks
per schoolroom also makes it much easier to find the source
of a problem if something ever goes wrong with the network.
Dos
DO make
the longest run first,
so that you can take advantage of the pull
string on the shorter runs.
DO make
a "cut sheet" - a rough diagram showing where the cable
runs are and the numbers of the schoolrooms they go to.
Later, when you wire the
patch panel, the cut sheet will tell you what order
to position the wires in.
DO use tie-wraps to
cinch runs of multiple cables.
Don'ts
DON'T EVER cut
unlabeled cable. Label cable before routing it,
or you'll lose track of which cables go to which schoolrooms.
DON'T label
cable "Ms. Scholl's classroom." Instead, use a label that
will be understandable to someone years later, such as "Rm.
103."
DON'T plan
runs longer than 328 feet. Data will travel more slowly
over longer lengths of cable.
DON'T allow
cable to be stretched, pinched or kinked, or data will
travel over it more slowly. Don't tie tie-wraps too tight
- they should be able to slide a little.
DON'T cut
corners with cable - leave ample slack. A few feet of cable
costs a lot less than the time it takes to redo a run because
of wiring mistakes or stretched cable. When you wire the jacks and
patch panel, you shouldn't be tethered up against the wall.
Leave enough slack to reach the floor and extend another
2 or 3 feet at both ends of the cable. In addition, it's
standard practice to leave a service coil - a few extra
feet of cable coiled up inside the ceiling or other out-of-the-way
place.
Routing
the First Run of Cable
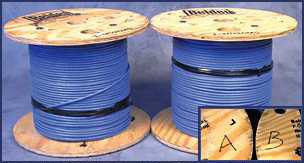
 1. Your
kit will contain two spools of cable, and you will route
two cables to each schoolroom. Label the spools "A" and "B" so
you can tell them apart.
1. Your
kit will contain two spools of cable, and you will route
two cables to each schoolroom. Label the spools "A" and "B" so
you can tell them apart.
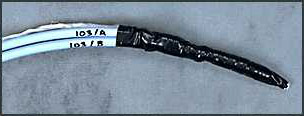
2. Label
the end of the cable from each spool in a similar way,
but include the name of the schoolroom you're about to
run cable to - for example, "103/A" and "103/B." Write
the label on the cable sheath. Use a permanent marker that
won't rub off easily. Label the cable three times, about
2 feet apart, so that you won't lose the labeling if it
rubs off or if you cut off some of the sheath later when
you're wiring up the ends.
3. Using
electrical tape, tape together the two cable ends and the
end of a pull string, as shown in the photo. (The string
doesn't need to be labeled.) Whether you use a telepole or
not, tie a few half-hitches around the cables with the
pull string before taping, and use plenty of tape. Skimping
on tape could cost you time later if the string or cables
pull out.
4. Pull
all three - cable A, cable B and the pull string - along
the run. The next topics show some techniques for routing
cable along walls, inside attics and ceilings and inside
walls. Allow enough cable to reach all the way to both
jack locations in each schoolroom, plus enough slack to
reach the floor and extend another 2 or 3 feet.
5. DON'T
CUT THE CABLE YET.
6. Go
back to the central point. Write labels ("Rm. 103/A" and "Rm.
103/B" again) on the cable just inside of where you want
to cut it.
7. All
right, NOW take out your wire snips and cut the cable and
the pull string. See? Now the cable is labeled at both
ends.
Routing
Subsequent Runs
 Often,
two or more runs follow the same route part way, then diverge.
In that case, do this:
Often,
two or more runs follow the same route part way, then diverge.
In that case, do this:
1. Strip
a few inches of sheath off the cable. Then, just as you
did for the first run, label both cables.
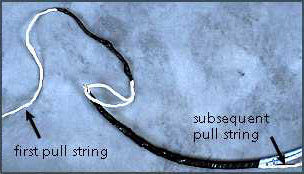
2. Attach
the tail end of the first pull string to the leading
end of a subsequent pull string and the cables as
follows:
- a. Bend
the stripped cables into a hook shape and loop the tail
end of the first pull string around the hook. Tape the
first pull string securely.
- b. Knot
the subsequent pull string around the two cables
with half-hitches. Tape the cables and the pull
string together securely as shown.
3. Go
to the spot where the runs diverge and use the first pull string
to pull the new cables up to that point. The new string will
now be in place for the next run.
4. Now
run the new cable pair by itself the rest of the way.
Glossary
of Terms