What Happens at the Central Point
 In
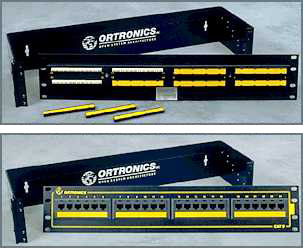
Step 3, you'll complete the cable connections at the central
point by wiring one end of each cable to the patch panel.
Then you'll mount the patch panel on a wall-mounted bracket. In
Step 3, you'll complete the cable connections at the central
point by wiring one end of each cable to the patch panel.
Then you'll mount the patch panel on a wall-mounted bracket.
On one side
of the patch panel are rows of pin
locations, or color-coded slots. Just as you did with
the jacks, on the patch panel you'll use a punch
tool to punch down the wires and make electrical connections.
On the other side of the patch panel are rows of ports,
which look like female phone jacks only bigger.
The "central
point" is the place where the patch panel is housed. It
can be a closet, a librarian's office or a corner of the
computer lab; it just needs to be out of the way of traffic
so that cables and wires don't get pulled out of place
accidentally. The patch panel acts like a switchboard:
After NetDay, a technician may use the ports to cross connect
the cables coming in from the schoolrooms (forming a local network)
and connect the local network to the outside (linking to
the Internet or other
wide area network).
Glossary
of Terms
|